Quickstart with Stripe
Intro
Stripe is a payment processing platform. Use cases include:
- Monetizing access to expensive API calls
- Monetizing premium extension feature
- Selling themes, merch, physical and digital goods, etc.
Scenario
You are a SaaS company looking to offer a premium API service to your customer via an extension. You would like your users to pay $5/month before the extension can access this premium feature.
Setting Up a Stripe Product Link
Due to Manifest v3's restriction with remote code execution (opens in a new tab), there are limited options to have a PCI-compliant payment system integrated into an extension. The easiest way is to set up a Stripe Product Link.
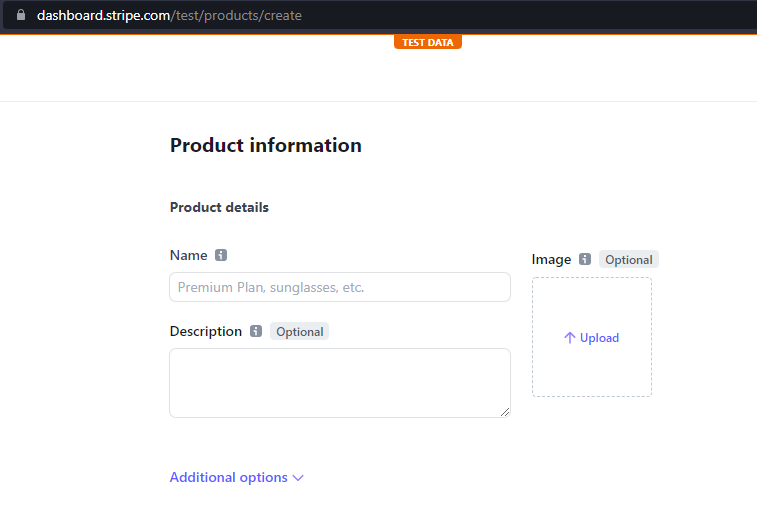
To set up a Stripe Product Link, you must create a Stripe product. Head to Stripe Product Dashboard (opens in a new tab) page, and press Add Product, then fill out the information:
Then, go to the product page and click the Create payment link button:

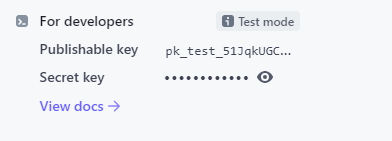
Above should get you the Stripe Payment Link. For backend authorization, head to the Stripe Dashboard Home Page (opens in a new tab) for the Secret Key:
Using env variable
Assuming you have set up a basic Plasmo project, the first thing to do is to set up our environment variables:
PLASMO_PUBLIC_STRIPE_LINK=https://buy.stripe.com/test_XXXXXXXX

STRIPE_PRIVATE_API_KEY=sk_test_xxxxxxxxxxxxxxxxxxxxxx
To enable typescript IntelliSense, create an index.d.ts file:
.index.d.ts (opens in a new tab)
Accessing Chrome identity API
To associate a subscription with a user, we can use their email address. One quick way of doing so is to leverage the Chrome extension's identity API (opens in a new tab). To prevent unauthorized access, we will need to setup the OAuth2 authentication schema, which works as follow:
- Our extension generates an OAuth2 access token
- Extension sends request with the token to our backend
- Backend validates the tokens to get the user's email address
- Backend queries subscription status for the user
To enable the permission required for this feature, add the following to the manifest field of your package.json file:
{
  ...
  "manifest": {
    ...
    "permissions": ["identity", "identity.email"]
  }
}The ... means if you already have anything there, preserve it. You will see
this in many of our code examples.
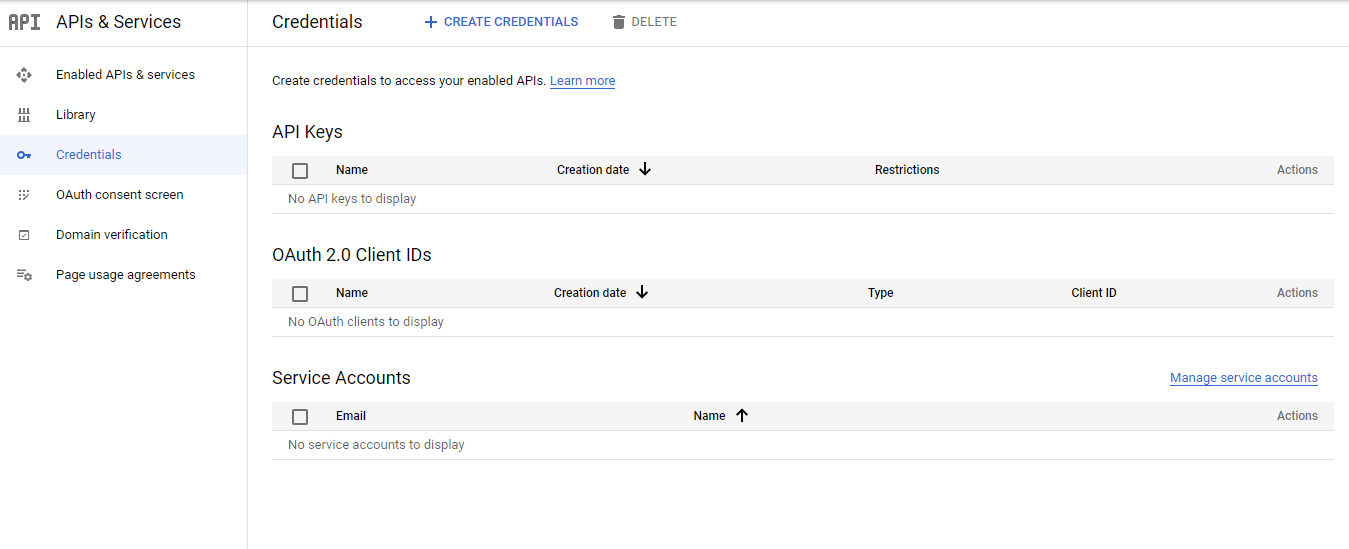
Then, we will need to set up an OAuth2 client ID using Google Cloud Platform (GCP). Quickly create a new project in GCP following this guide (opens in a new tab), then navigate to the Credentials page: https://console.cloud.google.com/apis/credentials?referrer=search&project=<YOUR_PROJECT_ID>. It'll show you something like this:
Click CREATE CREDENTIALS, then select OAuth client ID:
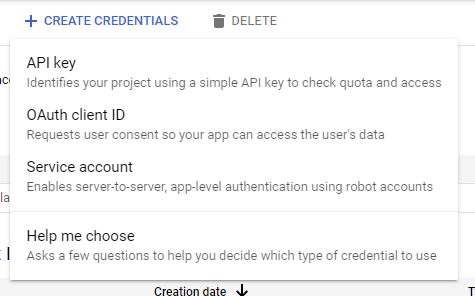
On the next page, pick Chrome app. The form will then ask for an Application ID:
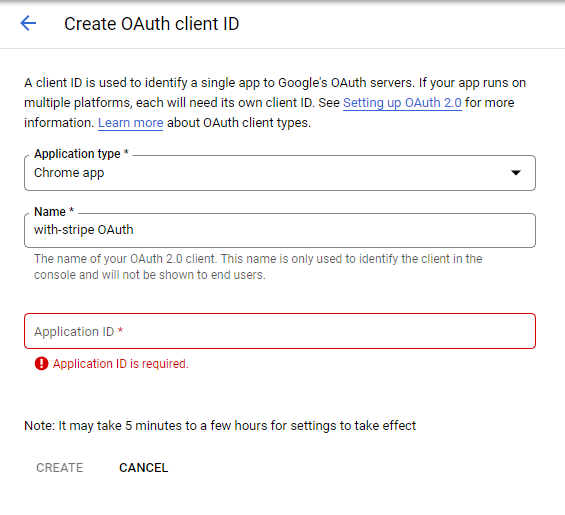
This will be your Extension ID - the next section is about how to obtain it.
Set up fixed Extension ID for development
You will want to pin your extension ID for development. If you accidentally remove your development extension from your browser, the extension ID will be lost, and your OAuth2 client will be invalidated.
Since Chromium derives the extension ID from a public key, you can pin it by generating your own key instead. You can specify it in the manifest override of your package.json. We can generate this key by following this Stack Overflow answer (opens in a new tab):
- Generate the private key:
openssl genrsa 2048 | openssl pkcs8 -topk8 -nocrypt -out key.pem- Generate the public key from the private key above:
openssl rsa -in key.pem -pubout -outform DER | openssl base64 -AWe can then use this key by leveraging env variable in our manifest override:
...
CRX_PUBLIC_KEY=v47xxx{
"manifest": {
...
"key": "$CRX_PUBLIC_KEY"
}
}Run the development server then load the extension into your browser. Then, copy the extension ID:
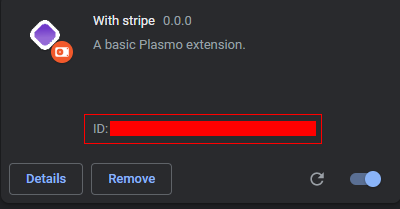
Paste the ID into the OAuth form's Application ID field, then submit. You will then receive your OAuth2 client ID:
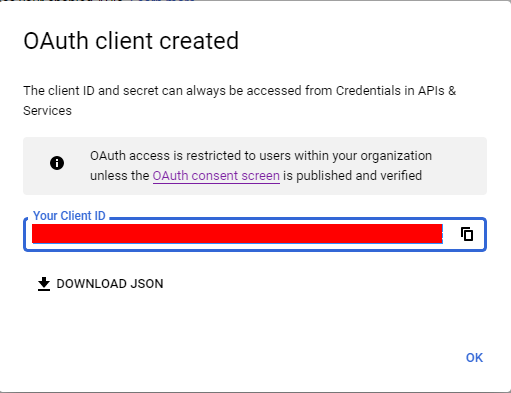
Add it to your environment variables:
...
OAUTH_CLIENT_ID=<YOUR_OAUTH_CLIENT_ID>
And use it in our manifest override:
{
  ...
  "manifest": {
    ...
    "oauth2": {
      "client_id": "$OAUTH_CLIENT_ID",
      "scopes": [
       "https://www.googleapis.com/auth/userinfo.email",
       "https://www.googleapis.com/auth/userinfo.profile"
      ]
    }
  }
}
We are now ready to generate an OAuth access token to authorize and process the user's subscription!
Accessing the user info
We can use chrome.identity.getProfileUserInfo to know who our user is. To cache this data and reuse it across our app, we can create a quick React context (opens in a new tab). The easiest way is using puro (opens in a new tab) - Plasmo's context utility library. Install it by adding the library to your package.json file and run pnpm i:
{
  ...
  "dependencies": {
    ...
    "puro": "0.3.4"
  }
}
Then, we can create our provider:
core/user-info.tsx (opens in a new tab)
import { createProvider } from "puro"
import { useContext, useEffect, useState } from "react"

const useUserInfoProvider = () => {
  const [userInfo, setUserInfo] = useState<chrome.identity.UserInfo>(null)

  useEffect(() => {
    chrome.identity.getProfileUserInfo((data) => {
      if (data.email && data.id) {
        setUserInfo(data)
      }
    })
  }, [])

  return userInfo
}

const { BaseContext, Provider } = createProvider(useUserInfoProvider)

export const useUserInfo = () => useContext(BaseContext)
export const UserInfoProvider = Provider
And use it in our popup:
popup.tsx (opens in a new tab)
import { UserInfoProvider, useUserInfo } from "~core/user-info"

const EmailShowcase = () => {
  const userInfo = useUserInfo()

  return (
    <div>
      Your email is: <b>{userInfo?.email}</b>
    </div>
  )
}

function IndexPopup() {
  return (
    <UserInfoProvider>
      <div
        style={{
          display: "flex",
          flexDirection: "column",
          padding: 16
        }}>
        <h1>
          Welcome to your <a href="https://www.plasmo.com">Plasmo</a> Extension!
        </h1>
        <EmailShowcase />
      </div>
    </UserInfoProvider>
  )
}

export default IndexPopup
Integrating the Stripe Link into the Popup page
To streamline the Stripe payment link with the identity API, we can pre-fill the email on the Stripe hosted form via their API parameters (opens in a new tab) with the email obtained from the UserInfoProvicer above. Before we redirect our user to the Stripe payment, let's also invoke the OAuth flow to ensure the customer consents for us to use their email address. This will also initiate an access token cache for our extension, which allow future invocation to be non-interactive.
popup.tsx (opens in a new tab)
<button
  disabled={!userInfo}
  onClick={async () => {
    chrome.identity.getAuthToken(
      {
        interactive: true
      },
      (token) => {
        if (!!token) {
          window.open(
            `${process.env.PLASMO_PUBLIC_STRIPE_LINK}?client_reference_id=${
              userInfo.id
            }&prefilled_email=${encodeURIComponent(userInfo.email)}`,
            "_blank"
          )
        }
      }
    )
  }}>
  Subscribe to Paid feature
</button>
Verify the subscription and enable some premium features
We will now set up our backend to verify the user's subscription. We can simplify this process by leveraging NextJS interoperability with Plasmo. We will first install NextJS and some utility libraries:
{
  "scripts": {
    "start": "next start",
    "dev": "run-p dev:*",
    "dev:plasmo": "plasmo dev",
    "dev:next": "next dev --port 8472",
    "build": "run-p build:*",
    "build:plasmo": "plasmo build",
    "build:next": "next build"
  },
  ...
  "dependencies": {
    ...
    "next": "12.1.6",
    "google-auth-library": "8.0.2",
    "swr": "1.3.0",
    "stripe": "9.8.0"
  },
  "devDependencies": {
    ...
    "@plasmohq/rps": "1.3.4",
  }
}@plasmohq/rps is a helper library from Plasmo to facilitate running scripts
in parallel or sequentially. It is a modernized fork of
npm-run-all (opens in a new tab)
Once we've set up our dependencies, let's create some utility functions:
Then, we create our 2 API routes: one to check for the user's subscription and one to invoke the premium feature. Both API routes must first parse the authorization header for an access token, then use the token to fetch the user profile independently before using the profile's data to acquire the user's subscription.
pages/api/check-subscription.ts(opens in a new tab)pages/api/premium-feature.ts(opens in a new tab)
To call the dev server from our extension, we can store the API URI using an environment variable and reference it in our manifest host:
PLASMO_PUBLIC_API_URI=http://localhost:8472
...{
...
"manifest": {
...
"host_permissions": [
"$PLASMO_PUBLIC_API_URI/*",
"https://*/*"
]
}
}Kill and re-run pnpm dev to start both the dev server for our backend and our extension. Before we call our API, let's set up more client-side helpers:
Now, we can use swr to call and revalidate the check-subscription API in our popup:
import useSWR from "swr"
import { callAPI } from "~core/premium-api"

...
  const { data, error } = useSWR<{ active: boolean }>(
    "/api/check-subscription",
    callAPI
  )


  if (!!error || !data?.active) {
    // No active subscription, show pay button
  }

  // Has active subscription, show premium feature button
Then, to invoke our premium feature:
<button
  onClick={async () => {
    const data = await callAPI("/api/premium-feature", {
      method: "POST"
    })

    alert(data.code)
  }}>
  Calling Awesome Premium Feature
</button>
Full Example
For the complete example, check out with-stripe (opens in a new tab) in the examples GitHub repository.